You might think this is a bit childish: Recently, a user named gadema in the open source hardware community Instructables shared his entire process of assembling a Prusa I3 3D printer using LEGO bricks. The creator explained that he didn't want to assemble a 3D printer at first, but just got it with some Lego bricks and stepper motors, and finally turned into a 3D printer. “I just wanted to use a stepper motor that was removed from the old HP printer to make an A4 plotter. After upgrading these stepper motors to Nema 17 motors, I decided to make one with X, Y and Z-axis machine. It evolved like a 3D printer," Gadema wrote.

“The LEGO and NEMA 17 stepper motors are perfect. A default 4×2 LEGO brick size is 32×16×9.6 mm, while the Nema stepper motor has a m3 hole pitch of just 31 mm. I used some insulation. The tape and M3×15 bolts firmly secure the NEMA 17 to the Lego Technic,†Gadema added. Of course, Tiangongshe also reported on some "3D printers" assembled by practical LEGO bricks. But this machine made by gadema has a full 3D printing function, which can print 3D objects using plastic wires, so it is worth trying.
But to be fair, this machine is not 100% LEGO, because it contains some non-Lego electronic components, but according to gedema, most of the electronics can be replaced with the Lego Mindstorms kit.
The non-Lego components used by gadema are mainly 4 stepping motors, 1 Ramps, 1 Atmega 2560, 4 Stepstick motor drives, 3 end stops, an extruder with Nema stepping, a power supply, a hot bed. And glass plates, as well as a number of wiring, nuts, bolts, etc. If you're going to try this very cool LEGO 3D printer yourself, here's a detailed tutorial on gedema. However, the caveat is that this is a more complicated project. If you are a newbie, it is best to refer to a tutorial on how to assemble a Prusa 3D printer. If you don't have such a tutorial at hand, you can check this out. (Click to enter: http://Building-a-Prusa-i3-3D-Printer/).

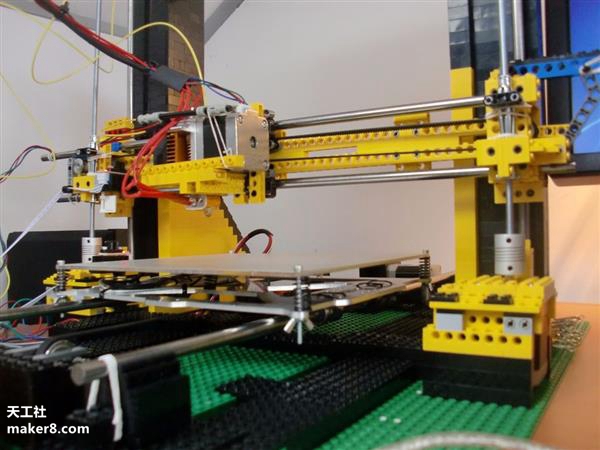
In fact, this is a special 3D printer build tutorial, which is special in that gadema starts with the Y axis, motor and belt, rather than the usual frame. The bottom of the 3D printer itself is a Lego plate 34 x 64 columns (19.2 x 51.2 cm) which is used to determine the exact position of the shaft. The motor that drives the entire 3D printer is attached to the LEGO technic assembly on the back of the machine. Only after the bottom and Y-axis are assembled can the Z-axis and X-axis with the stepper motor be added, and the last X-axis is the most difficult to fix. “The original Prusa X-axis is left and right separated and then connected with two rods. And for stability, I made a large X-axis using long technic bricks,†Gadema explained. He also chose an assembled Geeetech MK8 extruder with a nozzle size of 0.3 mm by default and 1.75 mm wire. You can also add something else to your needs. In addition, the purpose of the end stop is to prevent the extruder from coming out of the frame.

After all the mechanical parts have been assembled, all that is left is to connect all the electronic circuits, test equipment and installation software. Since gadema himself has assembled two common 3D printers from beginning to end, his comments and suggestions in the tutorial are very useful and worth learning. Calibration and configuration can be a bit complicated, so it's best to look at the RepRap Wikipedia from time to time, but in other respects gadema's tutorials cover all the steps carefully, allowing you to create a very unusual 3D printer using LEGO bricks.


(Editor)
Festival Toy,Festival Toys Halloween,Inflatable Halloween Decoration Kids Toy,Halloween Party Decoration Toys
J&TZ CO.,LTD , https://www.inflatable-toy.com