OTX is a programming language based on XML files and conforms to the ISO13209 standard. When developing OTX sequences, it is recommended that the script be modularized to facilitate diagnostic testing. The core function provided by OTX is the package. The package in OTX is represented by a directory with the same name. You can create a new package in the script browser through the context menu.
This article mainly introduces how to use OTX-Studio to create a diagnostic sequence based on the OTX standard, and take Example_Project in DTS as an example to create a read voltage service for the ACM controller.
1. Open OTX-Sdudio and create a new project file:
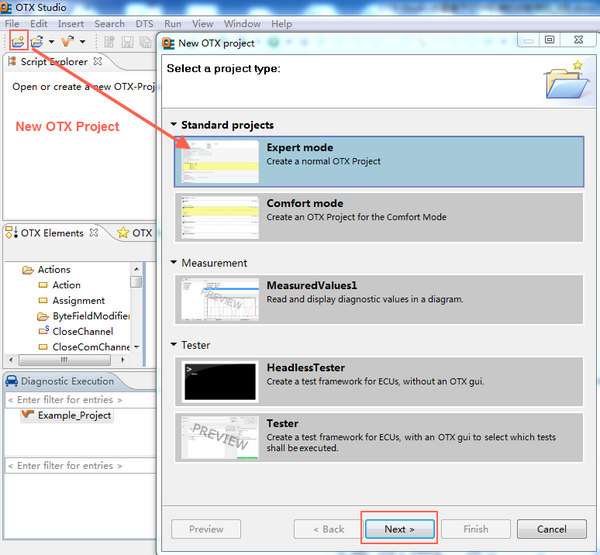
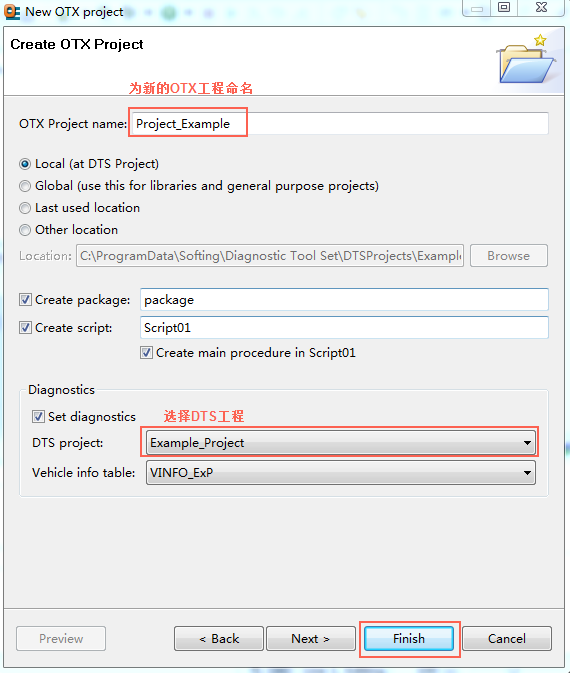
2. Project configuration: including project name, project path, package naming, script naming, and diagnosis project selection.
3. Click "Finish" to display the OTX sequence editing interface. The various views are introduced as follows:
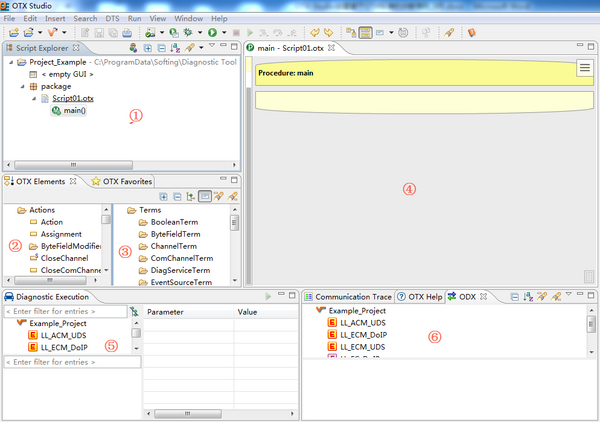
â‘ Script Explorer view: allows users to define, view and change the project structure and objects. The project structure is defined by an equivalent file structure on the file system.
â‘¡OTX element view: shows all available elements, which can be used to build OTX sequences. They are divided into five categories: operations (statements that can be dragged directly to OTX sequences), control nodes (used to construct OTX sequences: IF, LOOP, etc.), parallel nodes (used to process parallel execution of OTX sequences), Path (used For access to map and list elements), terminology (expression elements that can be dragged and dropped into existing operations).
â‘¢OTX preference view: can be configured by the user and contains the following elements: any element of the OTX element view, any diagnostic service from the ODX view, any program of the library.
â‘£ Hierarchical call view: When the OTX test sequence is developed modularly, each module can call each other. To get an overview of which sequences are called by others, this view shows two relationships: showing all the sequences calling the selected sequence, and showing all the sequences called by the selected sequence.
⑤Diagnosis execution view: Contains the logical link layer of the controller in the selected project.
â‘¥ ODX view: contains all elements of the ODX data foundation. The database type can be CBF or ODX (MSR).
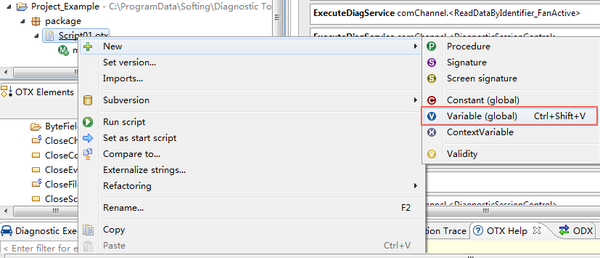
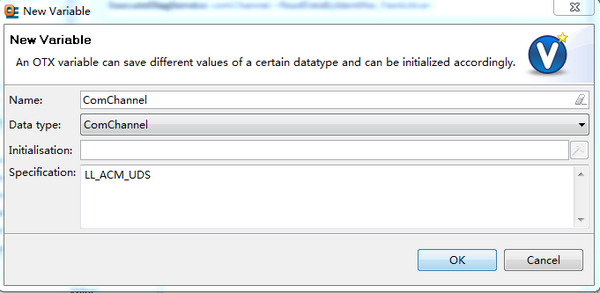
4. The following starts to create a test sequence, first create global variables, as shown in the figure:
The parameters are set as follows:
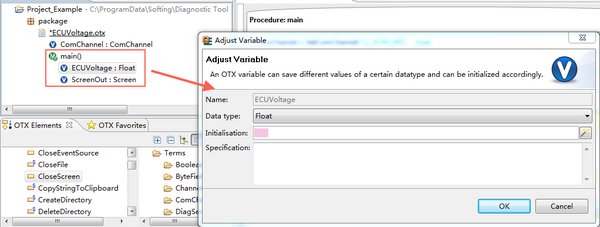
5. Create local variables ECUVoltage and ScreenOut, method main-> right-click-> variable name, data type, initialization value, description. The created variables can be directly referenced when doing the sequence.
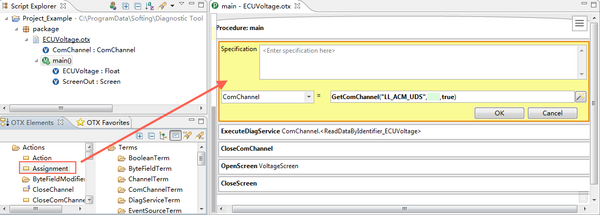
6. Mouse click Assignment and drag it to the call view. This routine can be configured as shown in the figure below. The function is to select the controller to be tested.
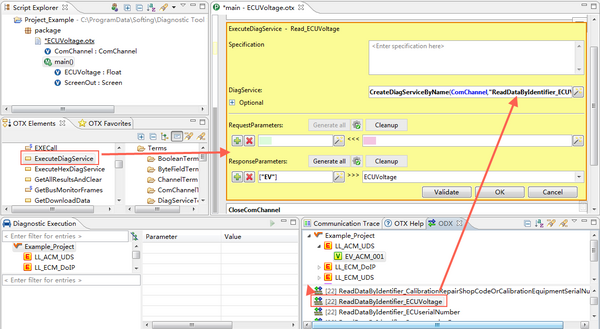
7. Mouse select ExecuteDiagService and drag it to the right call view. When editing this item in the call view, the parameters in DiagService can be added automatically by double-clicking the controller test item below. ResponseParameters is the abbreviation of the tested service item.
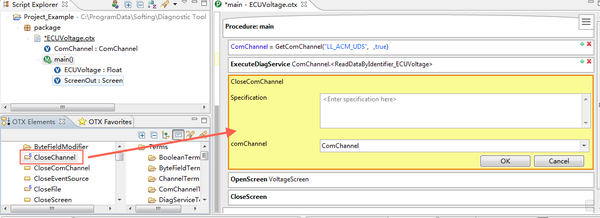
8. After the test item test is completed, close the channel (this routine only adds a diagnostic service, so close the channel here, the actual application operation needs to operate according to the test requirements).
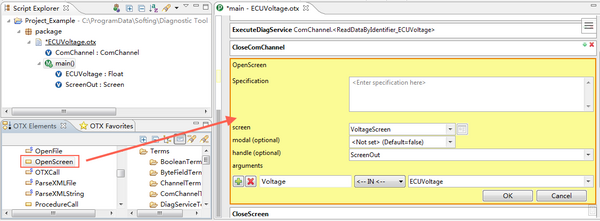
9. Select the OpenScreen item and drag it to the calling view. It is used to pop up the result display box when calling in Monaco. Edit this item according to the parameters in the figure:
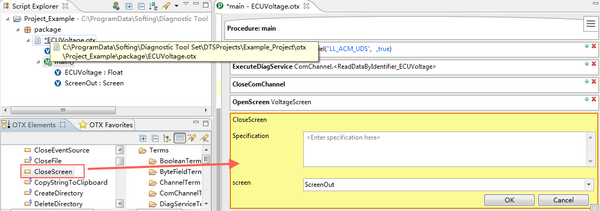
10. Select the CloseScreen item and drag it to the call view, edit this item according to the parameters in the figure:
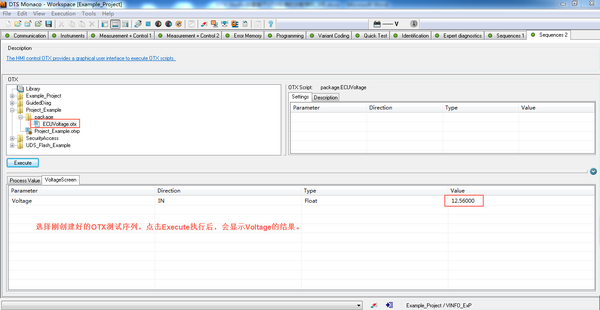
11. Save the project after editing, so that a test sequence based on the OTX standard is created. This test sequence can be opened in Monaco. After execution in simulation mode, the voltage value of the controller can be displayed as 12.56V.
Ht35 Brush Cutter Parts,Brush Cutter Air Filter,Brush Mower Gearbox,Brush Cutter Shaft Assembly
Shaoxing Haotuo Machinery CO., LTD. , https://hotochainsaw.com